2013-05-26 Processing (big) data with Hadoop
Big Data becomes very popular nowadays. If the concept seems very simple - use many machines to process big chunks of data -, pratically, it takes a couple of hours before being ready to run the first script on the grid. Hopefully, this article will help you saving some times. Here are some directions I looked to create and submit a job map/reduce.
Unless you are very strong, there is very little chance that you develop a script without making any mistake on the first try. Every run on the grid has a cost, plus accessing a distant cluster might take some time. That's why it is convenient to be able to develop a script on a local machine. I looked into several ways: Cygwin, a virtual machine with Cloudera, a virtual machine with HortonWorks, a local installation of Hadoop on Windows. As you may have understood, my laptop OS is Windows. Setting up a virtual machine is more complex but it gives a better overview of how Hadoop works.
Here are the points I will develop:
- Develop a short script in Hue and Hive on this local machine,
- Install a virtual machine (VM) on a laptop,
- Run this script on the grid (using Amazon AWS).
Contents:
- Local run with Java
- Installation of a local server with HortonWorks
- Install a virtual machine (Cloudera)
- Files to download
- Only for French keyboards
- Upload, download files to the local grid
- Install the VMWare Tools and create a shared folder
- Final tweaks: change the repository
- Install Python 3.3, Numpy (optional)
- Install R and Rpy2
- Install a virtual machine (HortonWorks)
- Develop a short script
- Hadoop and Python
- Using Amazon AWS
- Errors you might face
2014-06-03 French tutorial : Partie 2 : Installation et configuration d'un cluster simple nœud avec Cloudera CDH 5
Local run with Java
I used this page to run Setting up Pig and AWS on my laptop. I followed the same steps, first with Cygwin and without.Installation of Cygwin
The first step is obviously to install everything which is needed to compile and execute a script PIG. Hadoop only works on Linux but we do not necessarily need Linux to execute a PIG script. However, we need Cygwin which provides an environnement very similar to Linux but on Windows.
- Download and install Cygwin: you should install every package related to perl.
- Download and install Java JDK,
ls /cygdrive/c/"Program Files"/Java/jdk1.7.0_21/bin/Then type:
export JAVA_HOME=/cygdrive/c/"Program Files"/Java/jdk1.7.0_21/bin/
export PATH=$JAVA_HOME:$PATH
I then followed the instructions described here: Setting up Pig and AWS. You need to download hw3.tar.gz and unzip it:
tar -xzf hw3.tar.gz
cd hw3
tar -xzf pigtutorial.tar.gz
tar -xzf hadoop-0.18.3.tar.gz
Cygwin (and Linux) are quite strict with file attribute. Use the following command to change them:
chmod u+x+r <path>Because I did it in folder /tmp, I had to type the following commands (as mentioned here):
chmod u+x /tmp/hw3/hw3/hadoop-0.18.3/bin/hadoop
export PIGDIR=/tmp/hw3/hw3/pigtmp
export HADOOP=/tmp/hw3/hw3/hadoop-0.18.3
export HADOOPSITEPATH=/tmp/hw3/hw3/hadoop-0.18.3/conf/
export JAVA_HOME=/cygdrive/c/"Program Files"/Java/jdk1.7.0_21/bin/
export PATH=$HADOOP/bin/:$PATH
Executing a script PIG with Cygwin
For that example, I'm using the following file velib_20r.7z:
3 AVENUE BOSQUET - 75007 PARIS	33	36	0	69	0	2013-05-24 18:30:00	48.86164049957625	2.302250344175951	07022 - PONT DE L'ALMA	7022	OPEN
18 RUE MARIE ANDREE LAGROUA - 75013 PARIS	8	52	0	61	0	2013-05-24 18:30:27	48.828595283857425	2.380220606266108	13055 - LAGROUA	13055	OPEN
25 RUE LOUIS LE GRAND - 75002 PARIS	6	25	0	31	0	2013-05-24 18:30:43	48.870508937203915	2.334054461939329	02015 - OPERA - CAPUCINES	2015	OPEN
...
And the following script velib1.pig:
raw_velib =
    LOAD 'velib_20r.txt'
    USING PigStorage('\t')
    AS (address,
        available_bike_stands:int,
        available_bikes:int,
        banking,
        bike_stands,
        bonus,
        last_update,
        lat:double,
        lng:double,
        name,
        number:int,
        status);

stations_group =
    GROUP raw_velib
    BY (name, status);

stations_count =
    FOREACH stations_group
    GENERATE flatten($0), COUNT($1) as count;

STORE stations_count
INTO 'stations_count_2013-05-24.paris.short.pig.2.txt'
USING PigStorage();
I pasted the files in the folder: /tmp/hw3/hw3/pigtmp.
Now, to execute the script, we just need to do:
java -cp pig.jar org.apache.pig.Main -x local velib1.pigIf everything goes well, you should see:
$ java -cp pig.jar org.apache.pig.Main -x local velib1.pig
2013-05-26 18:03:31,221 [main] INFO  org.apache.pig.backend.local.executionengine.LocalPigLauncher - Successfully stored result in: "file:/C:/cygwin/tmp/hw3/hw3/pigtmp/stations_count_2013-05-24.paris.short.pig.2.txt"
2013-05-26 18:03:31,222 [main] INFO  org.apache.pig.backend.local.executionengine.LocalPigLauncher - Records written : 1228
2013-05-26 18:03:31,222 [main] INFO  org.apache.pig.backend.local.executionengine.LocalPigLauncher - Bytes written : 0
2013-05-26 18:03:31,222 [main] INFO  org.apache.pig.backend.local.executionengine.LocalPigLauncher - 100% complete!
2013-05-26 18:03:31,222 [main] INFO  org.apache.pig.backend.local.executionengine.LocalPigLauncher - Success!!
To check the output, just type:
head -n 10 stations_count_2013-05-24.paris.short.pig.2.txtTo see:
00901 - ALLEE DU BELVEDERE      OPEN    7
00903 - QUAI MAURIAC  / PONT DE BERCY   OPEN    20
00904 - PLACE JOFFRE / ECOLE MILITAIRE  OPEN    20
00905 - GARE DE BERCY (STATION MOBILE 5)        OPEN    7
00906 - GARE DE L'EST   OPEN    20
00907 - FOIRE DU TRONE  OPEN    20
00908 - MALTE - FAUBOURG DU TEMPLE      OPEN    7
01001 - ILE DE LA CITE PONT NEUF        OPEN    20
01002 - PLACE DU CHATELET       OPEN    20
01003 - RIVOLI SAINT DENIS      OPEN    20
Executing a script PIG without Cygwin
The previous steps relies on Java. Cygwin is only needed because some java code needs bash. I used the same data and PIG script. I did not check carefully without Cywin but from a prompt window (DOS command), I typed:
set PIGDIR=C:\temp\local\folder
set HADOOP=C:\temp\local\folder\hadoop-0.18.3
set HADOOPSITEPATH=C:\temp\local\folder\hadoop-0.18.3\conf
set JAVA_HOME="c:\Program Files\Java\jdk1.7.0_21\bin"
set PATH=%PATH%;%HADOOP\bin;%JAVA_HOME%;C:\Perl64\bin

java -cp pig.jar org.apache.pig.Main -x local velib1.pig
I was able to get the same output except I got the following exception:
C:\temp\local\folder>java -cp pig.jar org.apache.pig.Main -x local velib1.pig
2013-05-27 22:08:12,790 [main] WARN  org.apache.hadoop.fs.FileSystem - uri=file:///
javax.security.auth.login.LoginException: Login failed: Cannot run program "bash": CreateProcess error=2, File not found
        at org.apache.hadoop.security.UnixUserGroupInformation.login(UnixUserGroupInformation.java:250)
        at org.apache.hadoop.security.UnixUserGroupInformation.login(UnixUserGroupInformation.java:275)
        at org.apache.hadoop.security.UnixUserGroupInformation.login(UnixUserGroupInformation.java:257)
        at org.apache.hadoop.security.UserGroupInformation.login(UserGroupInformation.java:67)
        at org.apache.hadoop.fs.FileSystem$Cache$Key.<init>(FileSystem.java:1410)
        at org.apache.hadoop.fs.FileSystem$Cache.get(FileSystem.java:1348)
        at org.apache.hadoop.fs.FileSystem.get(FileSystem.java:213)
        at org.apache.pig.backend.hadoop.datastorage.HDataStorage.init(HDataStorage.java:70)
        at org.apache.pig.backend.hadoop.datastorage.HDataStorage.<init>(HDataStorage.java:53)
        at org.apache.pig.impl.PigContext.connect(PigContext.java:168)
        at org.apache.pig.PigServer.<init>(PigServer.java:169)
        at org.apache.pig.PigServer.<init>(PigServer.java:158)
        at org.apache.pig.tools.grunt.Grunt.<init>(Grunt.java:54)
        at org.apache.pig.Main.main(Main.java:382)
013-05-27 22:58:57,666 [main] INFO  org.apache.pig.backend.local.executionengine.LocalPigLauncher - Successfully stored result in: "file:/C:/username/vmshare/data_local/stations_count_2013-05-24.paris.short.pig.2.txt"
2013-05-27 22:58:57,666 [main] INFO  org.apache.pig.backend.local.executionengine.LocalPigLauncher - Records written : 1228
2013-05-27 22:58:57,666 [main] INFO  org.apache.pig.backend.local.executionengine.LocalPigLauncher - Bytes written : 0
2013-05-27 22:58:57,666 [main] INFO  org.apache.pig.backend.local.executionengine.LocalPigLauncher - 100% complete!
2013-05-27 22:58:57,666 [main] INFO  org.apache.pig.backend.local.executionengine.LocalPigLauncher - Success!!
I checked the output was fine.
Installation of a local server with HortonWorks
2014-06-06: see first How To Install Hadoop on Windows with HDP 2.0, if it does not work, read what is below (but older that). It is Python 2.7 though (so I'll wait before trying).
I tried to install Hadoop on my laptop on Windows without using a virtual machine. HortonWorks recently made that possible and it is available here. It leads you to this page. I then tried to follow the instructions I found: single node.
I installed Java, set up JAVA_HOME to C:\Software\Java\jdk1.7.0_21 (I reinstalled Java because according to the documentation, spaces in paths are not very well handled. I added c:\Python27 to PATH. I then opened some ports:
netsh advfirewall firewall add rule name=AllowRPCCommunication dir=in action=allow protocol=TCP localport=$PORT_NUMBERWith the following list:
50070, 50075, 50090, 50030, 50060, 51111, 50111, 50470, 50475, 8020, 9000, 50020, 8021, 50010, 10001, 10000, 9083I then created a file clusterproperties.txt without changing anything except the cluster name:
#Log directory
HDP_LOG_DIR=c:\hadoop\logs

#Data directory
HDP_DATA_DIR=c:\hdp\data

#Hosts (Roles for the host machines in your cluster)
NAMENODE_HOST=${Hostname for your single node cluster}
SECONDARY_NAMENODE_HOST=${Hostname for your single node cluster}
JOBTRACKER_HOST=${Hostname for your single node cluster}
HIVE_SERVER_HOST=${Hostname for your single node cluster}
OOZIE_SERVER_HOST=${Hostname for your single node cluster}
TEMPLETON_HOST=${Hostname for your single node cluster}
SLAVE_HOSTS=${Hostname for your single node cluster}

#Database host
DB_FLAVOR=derby
DB_HOSTNAME=${Hostname for your single node cluster}

#Hive properties
HIVE_DB_NAME=hive
HIVE_DB_USERNAME=hive
HIVE_DB_PASSWORD=hive

#Oozie properties
OOZIE_DB_NAME=oozie
OOZIE_DB_USERNAME=oozie
OOZIE_DB_PASSWORD=oozie
And I run from a command line windows with admin rights:
msiexec /i "hdp-1.1.0-GA.winpkg.msi" /lv "hdp.log" HDP_LAYOUT="C:\temp\horton\clusterproperties.txt" HDP_DIR="C:\hdp\hadoop" DESTROY_DATA="no"And I got an error.
Install a virtual machine
Files to download
Hadoop only works on Linux. The most convenient way when you use Windows is then to use a virtual machine (VMware in my case). Even if you have Linux, you could save some time by using a preinstalled virtual machine (VM). Once it is installed, everything will take place inside this VM and it does not depend on the OS you are using.
Step 1: install VMWare Player, choose the version which corresponds to your system.
We then weed to build a virtual machine (linux) having all the tools we need (Hadoop, Hive, ...). Fortunately, Cloudera did that.
Step 2: download and uncompress the Cloudera QuickStart VM, choose the VMware version.
The VM is about 6Gb and it will take a couple of hours. After you did that, you need to run VMware and play the virtual machine you just downloaded. You should see that:
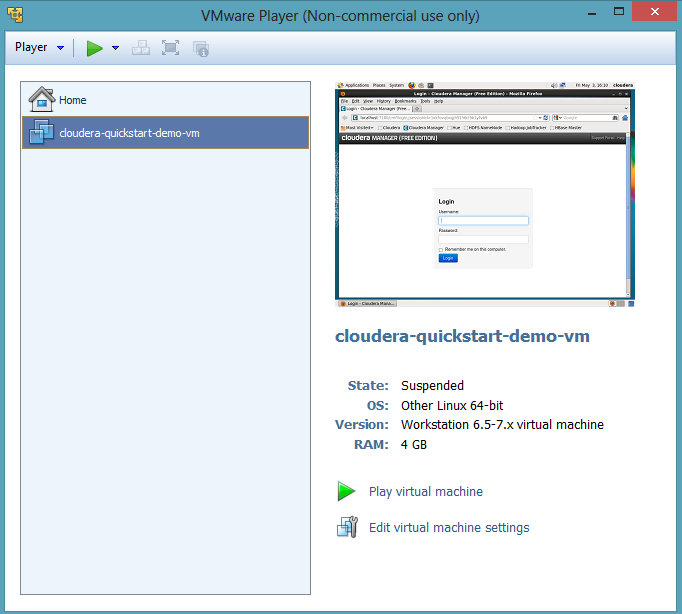
The first run will take sometimes (around an hour). It will boot for the first time, it will ask you to log in as an admin (admin, password: admin). Follow the installation steps, use the default value every time. You should get a virtual machine with all the expected services related to Hadoop up and running. Firefox is preinstalled and already opened on pages which allow you to control your Hadoop environnement. Try to nagivate, you should find a page like this one:
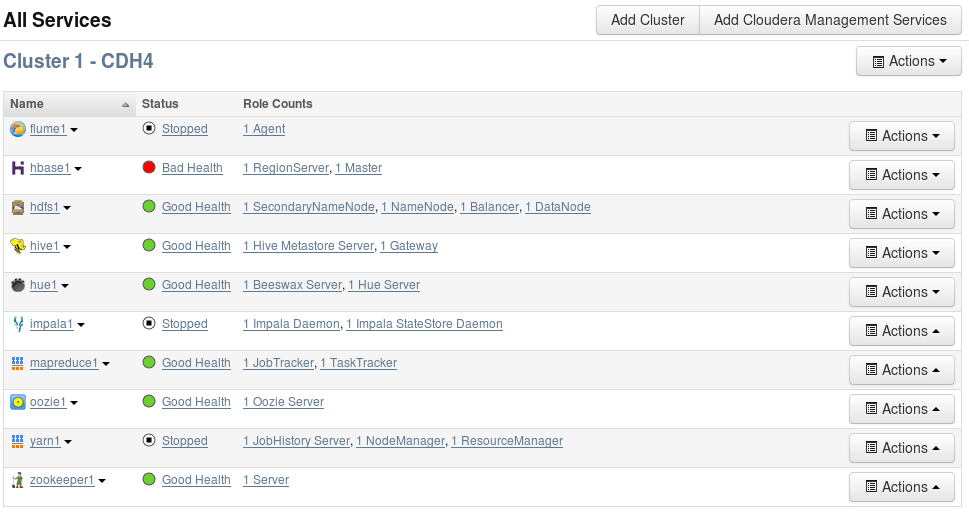
The linux version is CentOS Release 6.2. The previous snapshots shows the list of available tools on the machine. You can access internet from the virtual machine.
Upload, download files to the local grid
To check, it is working, you should open a terminal windows (click on the icon at the top of the screen and type:
hdfs dfsThis command gives access the the Hadoop filesystem (HDFS). It is a distributed filesystem or simply a kind of remote one. As a consequence, before doing any map/reduce job, we need to move a local file to HDFS. It must be uploaded:
hdfs dfs -put local_file dfs_nameFor example, try the series of commands:
hdfs dfs > commands.txt
hdfs dfs -put commands.txt .
hdfs dfs -ls
The first command created a text file, the second one uploaded it to the local grid, the last checked it was done. You can download a file by using the following command:
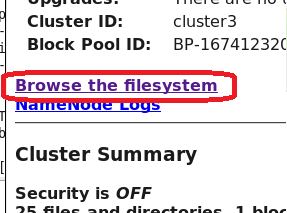
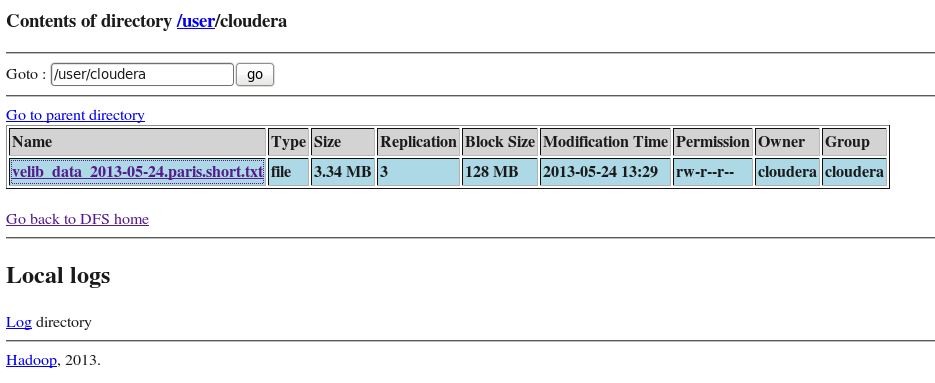
hdfs dfs -get dfs_path local_path
hdfs dfs -help get
The second command gives help on the function get. You will find a complete of the available commands here: Commands Guide. You can also check the file was uploaded through the web interface. Just click on on red areas in next figures.
 |
 |
 |
After I typed the following command line:
hdfs dfs -put velib_20r.txt velib_data_2013-05-24.paris.short.txtI was able to see:
Only for French keyboards
As usual, this virtual machine was made for English keyboard and if, like me, you have a French keyboard, it is better to switch to French inside the virtual machine. You need to:
- go to the menu System/Prefrences/Keyboard,
- add a French keyboard,
- remove the English one
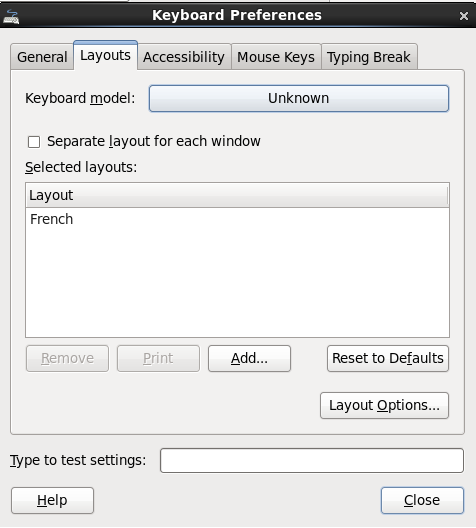
Unfortunately, on some machines, I still have to do that everytime I restart the virtual machine. I did not find a way to make it stable. And I had to remove the English keyboard, making the other one as default was not enough.
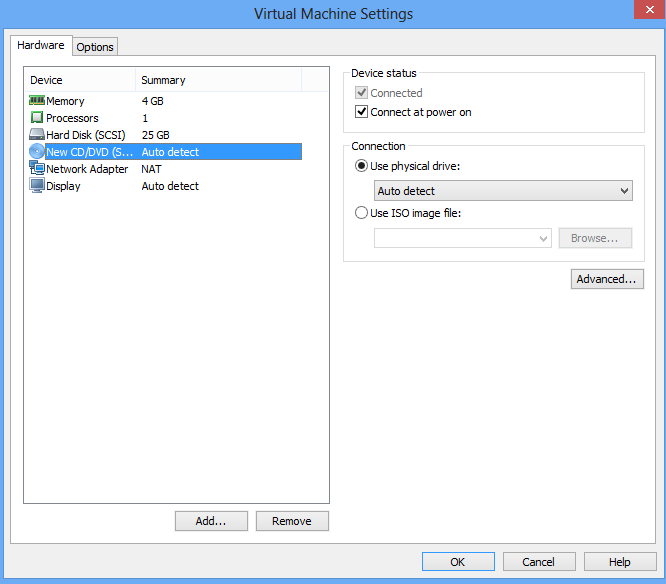
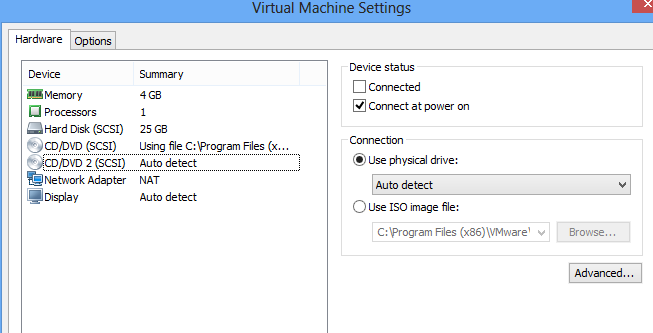
Install the VMWare Tools, create a shared folder
The VMWare tools are needed to allow copy/paste and to share a folder between the virtual machine and the physical machine. The first step is to tell the VM Ware there is a CD/DDVD reader. If there is none on your laptop, you need to create a virtual one. This optional step happens on the physical machine (not the VM Ware).
Step 3 (can be optional): create a virtual disk, associate a letter to it (on Windows)
We need to add a CD/DVD reader which is possible through the Virtual Machine Settings (through the VM Ware menu). The second picture is needed if the CD/DVD player is virtual.
 |
 |
Step 4: mount a CDROM
Then go to the second tab to enable option Share folder it is not done yet. The virtual machine needs then to be powered off to let the changes be effective. After you rebooted the VM, you should see a folder /dev/cdrom. We need to mound it.
mkdir /mnt/cdrom
mount -t iso9660 /dev/cdrom /mnt/cdrom
The next is to start installing the VM Ware tools (through the VMWare menu). A banner should appear at the bottom:
Step 5: install VMware Tools

By clicking on help, you get the next instructions (it does not work with Chrome, use Firefox, otherwise you can find it in the VMware player installation folder):
cd /tmp
ls /media/VMware\ Tools/
tar zxpf /media/VMware\ Tools/VMwareTools-9.2.3-1031360.tar.gz
cd vmware-tools-distrib
./vmware-install.pl
Choose all the default options. After that, go back to the VMware settings and add a shared folder (tab options / share folder, choose an existing folder. To verify it went well, add an empty file in this folder and type:
ls /mnt/hgfs/share/Your file should appear.
Final tweaks: change the repository
The virtual machine provided by cloudera contains a bug which happens when you want to install new packages: the repository is wrong. To change it, you need to edit one or all the following files:
gedit /etc/yum.repos.d/Cloudera-cdh.repo
gedit /etc/yum.repos.d/Cloudera-manager.repo
gedit /etc/yum.repos.d/Cloudera-impala.repo
To get the following paths:
http://archive.cloudera.com/cdh4/redhat/6/x86_64/cdh/4.2.0
http://archive.cloudera.com/impala/redhat/6/x86_64/impala/1.0
Install Python 3.3, Numpy (optional)
These steps are optional but since we are going to deal with some data, it is convenient to get a scripting language inside the virtual machine to automate some frequent steps (uploading, downloading from hdfs, running a job... I followed the steps described here: How to install Python 2.7 and 3.3 on CentOS 6. Before installing Python, some tools are required to compile Python. If these steps are skipped, the module sqlite3 will not work:
sudo su   % only if did not do it already
yum groupinstall "Development tools"
yum install zlib-devel bzip2-devel openssl-devel ncurses-devel sqlite-devel readline-devel tk-devel
I then started to install Python 3.3 in folder /tmp:
wget http://python.org/ftp/python/3.3.0/Python-3.3.0.tar.bz2
tar xf Python-3.3.0.tar.bz2
cd Python-3.3.0
./configure --prefix=/usr/local
make && make altinstall
I need easy_install to run (Python 3.3 is in folder /usr/local/bin/):
wget http://pypi.python.org/packages/source/d/distribute/distribute-0.6.40.tar.gz
tar xf distribute-0.6.40.tar.gz
cd distribute-0.6.40
python3.3 setup.py install
The rest is easier (from /usr/local):
bin/easy_install3.3 pip
bin/pip-3.3 install numpy
Install R and Rpy2
The installation of R is quite easy (source or here):
sudo su
rpm -Uvh http://dl.fedoraproject.org/pub/epel/6/x86_64/epel-release-6-8.noarch.rpm
yum install R
As well as the module rpy2:
pip install rpy2
Install a virtual machine (HortonWorks)
Not tried yet but it is here: HortonWorks Sandbox.
Develop a short script
The exemple was based on data coming from the Velib website. The short sample I used is available here: velib_20r.7z. It contains a table. I will not detail them as the goal of this post is to run jobs not to produce meaningful statistics.
Run a pig Script through the command line
The script PIG we want to run is pasted below. Basically, it counts the occurrences of a pair (name, status), both are strings. We can distinguish three steps:
- loading the data
- counting occurences
- storing the results
raw_velib =
    LOAD '/user/cloudera/velib_data_2013-05-24.paris.short.txt'
    USING PigStorage('\t')
    AS (address,
        available_bike_stands:int,
        available_bikes:int,
        banking,
        bike_stands,
        bonus,
        last_update,
        lat:double,
        lng:double,
        name,
        number:int,
        status);

stations_group =
    GROUP raw_velib
    BY (name, status);

stations_count =
    FOREACH stations_group
    GENERATE flatten($0), COUNT($1) as count;

STORE stations_count
INTO '/user/cloudera/stations_count_2013-05-24.paris.short.pig.txt'
USING PigStorage();
Let's assume we saved this script in job1.pig.
To run it, we just need to open a terminal (no need to be an admin) and to type:
pig job1.pigIf everything goes well, the terminal windows displays many lines of text and the last one will be:
...
Success!

Job Stats (time in seconds):
JobId	Maps	Reduces	MaxMapTime	MinMapTIme	AvgMapTime	MedianMapTime	MaxReduceTime	MinReduceTime	AvgReduceTime	MedianReducetime	Alias	Feature	Outputs
job_201305231054_0001	1	1	7	7	7	7	7	77	7	raw_velib,stations_count,stations_group	GROUP_BY,COMBINER	/user/cloudera/stations_count_2013-05-24.paris.short.pig.txt,

Input(s):
Successfully read 24521 records (3500381 bytes) from: "/user/cloudera/velib_data_2013-05-24.paris.short.txt"

Output(s):
Successfully stored 1228 records (40416 bytes) in: "/user/cloudera/stations_count_2013-05-24.paris.short.pig.txt"

Counters:
Total records written : 1228
Total bytes written : 40416
Spillable Memory Manager spill count : 0
Total bags proactively spilled: 0
Total records proactively spilled: 0

Job DAG:
job_201305231054_0001


2013-05-24 14:42:22,846 [main] INFO  org.apache.pig.backend.hadoop.executionengine.mapReduceLayer.MapReduceLauncher - Success!
We get the output through the web interface or by typing the command:
hdfs dfs -get stations_count_2013-05-24.paris.short.pig.txt
Checking job execution
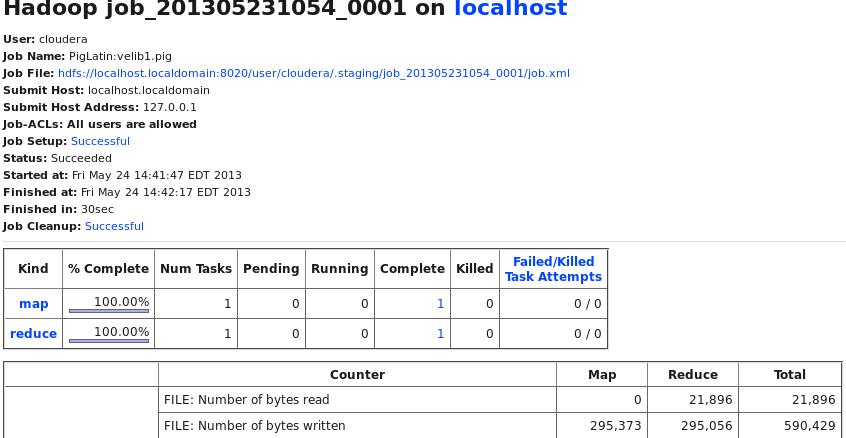
A job like the previous one takes a couple of seconds to run. However the web interface allows us to check its status. Next figure shows the click sequence.
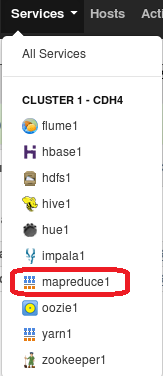 |
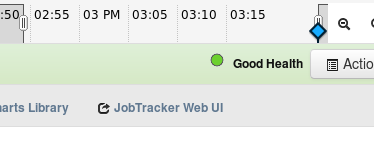 |
It leads to the following page:
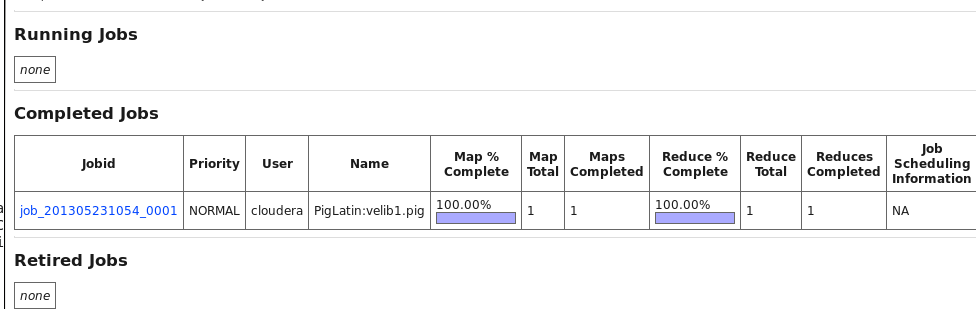 |
And if you click:
Same process with Hive and Hue
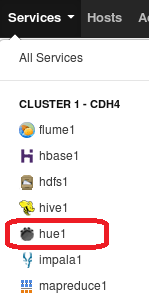
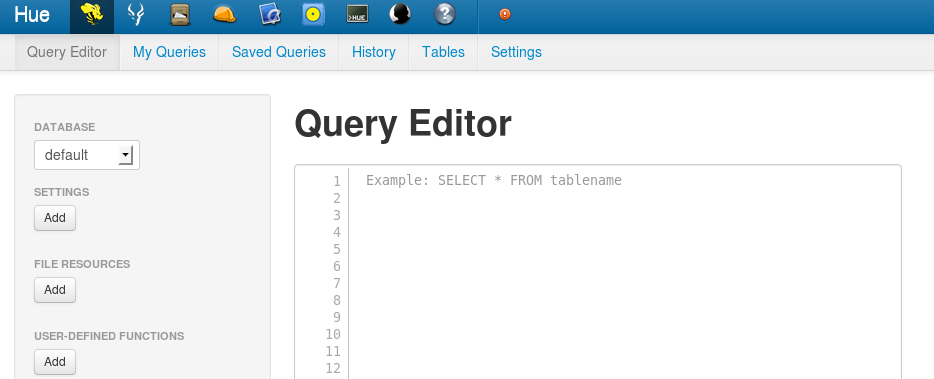
PIG's syntax is different from SQL but what it does is similar and could be written with a syntax similar to SQL. That's what Hive does. The other tool Hue is a web interface to edit and run Hive queries. I recommand reading about SQL before going further, both languages are very similar. The first step consists in creating a Hive table with our data. We need to put our data in a folder on HDFS.
hdfs dfs -mkdir ./folder_velib
hdfs dgs -put velib_20r.txt ./folder_velib/velib_data_2013-05-24.paris.short.txt
We can now create a Hive table. First, Hue:
 |
 |
You will see:
To upload the data in Hive the same we did with PIG, we need to paste the following query:
CREATE EXTERNAL TABLE raw_velib (
        address STRING,
        available_bike_stands INT,
        available_bikes INT,
        banking STRING,
        bike_stands INT,
        bonus STRING,
        last_update STRING,
        lat DOUBLE,
        lng DOUBLE,
        name STRING,
        number INT,
        status STRING)
    ROW FORMAT DELIMITED FIELDS TERMINATED BY '\t'
    LOCATION '/user/cloudera/folder_velib'  ;
The location is a folder HDFS, if you mess up with it and replace it
with a filename instead, you will get an error. If you insist, go to this
section. I recommend to save the query in a file or using the
Hue saving functionality. It is very likely you will have to type your query again
if you don't do it (even if you click on Back from the browser). By clicking on
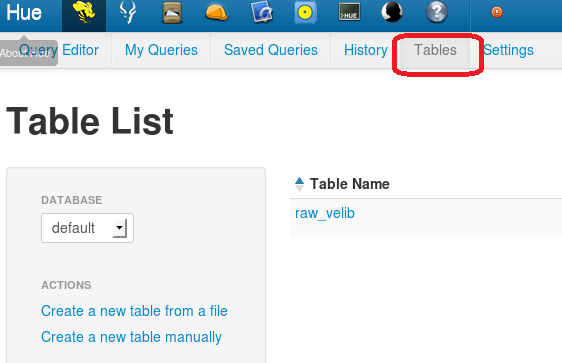
Table, you will see the table repository. Everything is clickable, so go ahead and look.
Next step is to a GROUP BY which you can do like this:
SELECT name, status, COUNT(*) AS nb
FROM raw_velib
GROUP BY name, status ;
Or like this if you like to rename tables:
SELECT a.name, a.status, COUNT(*) AS nb
FROM raw_velib a
GROUP BY a.name, a.status ;
Anyhow, after your job is completed, you will see the next window:
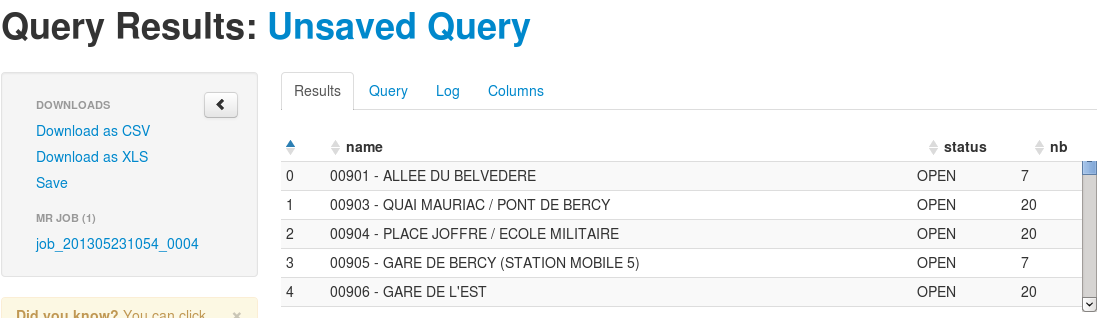
You can decide whether or not you want to save this intermediate result. At this stage, the table exists but does not have any name you can refer to. You need to give on to make it permanent.
Hive does not seem to be at a stage where you can chain SQL statement like you would do with PIG. It seems very convenient to extract basic statistics from table or to do a simple look up. However, for more consistent job, PIG seems more suitable.
Hadoop and Python
Some modules offers the possibility to use Hadoop through Python:
- Pydoop: this one only works on the Cloudera distribution (or was only tested with this one)
- Hadoopy : it seems to work everywhere.
- dumbo : not sure this one is still active.
Using Amazon AWS
Open an Amazon account
You need to go the page: Sign In or Create an AWS Account. You need a credit card and a phone number. You will receive an automated call.
Run a script PIG on Amazon
The following page is very precise about the required steps: Executing Pig scripts on AWS.
Errors you might face
Cannot retrieve repository metadata (repomd.xml)
The VMware provided by Cloudera can be enhanced by installing new packages. You can do that by using yum install .... But you may get the following error:
[root@localhost vmware-tools-distrib]# yum install anythingmmmmm
Loaded plugins: fastestmirror, refresh-packagekit, security
Loading mirror speeds from cached hostfile
 * base: ftp.ciril.fr
 * extras: ftp.ciril.fr
 * updates: ftp.ciril.fr
http://beta.cloudera.com/impala/redhat/6/x86_64/impala/0.7/repodata/repomd.xml: [Errno 14] PYCURL ERROR 22 - "The requested URL returned error: 404"
Trying other mirror.
Error: Cannot retrieve repository metadata (repomd.xml) for repository: Cloudera-impala. Please verify its path and try again
If that is the case go to this section.
ImportError: No module named '_sqlite3'
When importing sqlite3, the following issue can appear:
>>> import sqlite3
Traceback (most recent call last):
  File "<stdin>", line 1, in <module>
  File "/usr/local/lib/python3.3/sqlite3/__init__.py", line 23, in <module>
    from sqlite3.dbapi2 import *
  File "/usr/local/lib/python3.3/sqlite3/dbapi2.py", line 26, in <module>
    from _sqlite3 import *
ImportError: No module named '_sqlite3'
It means you forget to do the following steps before installing Python 3.3
(which you will have to do again):
sudo su   % only if did not do it already
yum groupinstall "Development tools"
yum install zlib-devel bzip2-devel openssl-devel ncurses-devel sqlite-devel readline-devel tk-devel
Compilation Error for a PIG script
We usually need a couple of tries before getting the final version of a script. We run the command pig <job_name> many times looking at errors such as the following one:
2013-05-24 15:08:24,415 [main] ERROR org.apache.pig.tools.grunt.Grunt - ERROR 1025:
file velib1.pig, line 25, column 14 Invalid field projection. Projected field [statu] does not exist in schema: address:bytearray,available_bike_stands:int,available_bikes:int,banking:bytearray,bike_stands:bytearray,bonus:bytearray,last_update:bytearray,lat:double,lng:double,name:bytearray,number:int,status:bytearray.
Details at logfile: /mnt/hgfs/vmshare/jobs/pig_1369422501213.log
Error messages can be mysterious but it usually gives valuable information: the place where the compilation error happened and an indication. Here, I forgot an "s" to the column status. A more detailed message is logged into a file you should look if the short message was not precise enough.
stations_group =
    GROUP raw_velib
    BY (name, statu);  /* it should be status */
Error when creating a Hive table
When creating a table with Hive, the location must be a folder and not a file. However, if you insist (like me), you will get the following error:
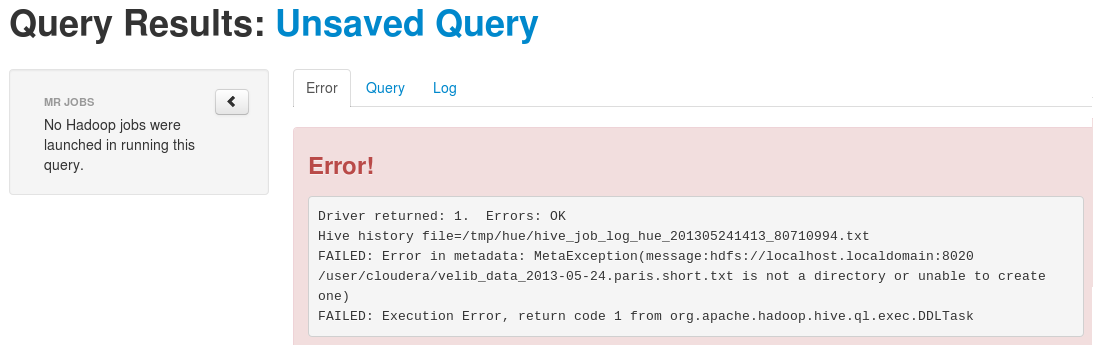
The location must be a folder.
|
Xavier Dupré
|